SimpleAudioMastering App

Introduction:


Mastering is the final step in music production before a tracks is been published. In the mastering process the track will be finalized and all parameters like loudness, bit-depth, sampling frequency are set to make sure the track meets all technical specification and sounds perfect.
So before a music track is published it is essential to get the track mastered because there will be no way back once the track is released. So even for low-budget productions there should always be a mastering to avoid that the track get rejected by customers because of technical or sound issues.


Why using an app for mastering:


Music production has changed dramatically during the last decade. The majority of productions are done in small homestudios or on the go with mobile equipment. The SimpleAudioMastering App help you to get your tracks professionally mastered without the need for expensive studio equipment. The app is using an advanced audio algorithm that is able to give your tracks the final touch. The audio algorithm is much more than just applying compression like cheap plug-ins - it is a complete mastering chain with several stages all aligned and matched up to get the best result.

The app is free what make it a no brainer to try. You will only be charged when you are fully satisfied with the results.


How to use the app:


1) The first thing is to load a music track into the user folder of the app. This folder contains all the unmastered files from the user and is empty by default. Select the folder symbol in the main view, left side at at bottom.

Here you can load a file from your user folder, your local media player or import a track from your dropbox account to the user folder. 


NOTICE: The output from offline processing will be stored in the mastered files folder - at start there are no files in this folder! When closing the app all files in this folder will be erased (can be switched off in preferences).


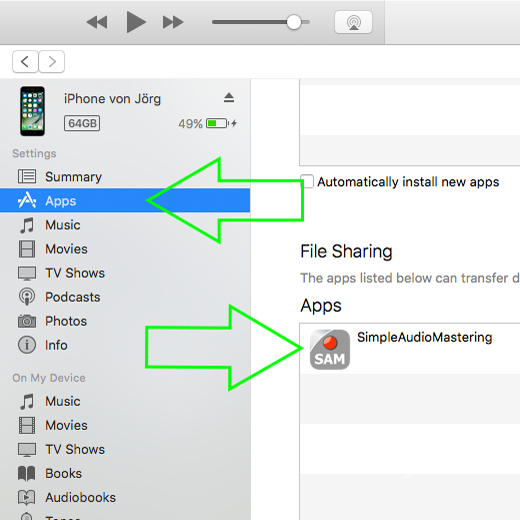
File transfer via iTunes:

1) Connect your device to your iMac and open iTunes. Inside iTunes please select your device, then go to "apps". Scroll down the list on the right side until you find "my apps".

2) Click on the "SimpleAudioMastering" app and you will find the UserData Folder of the app. Here you can exchange data just by drag&drop.


File transfer via dropbox:

1) To log-in to your account, press the gear button to access the user settings and press the "connect to dropbox" button. Once a connection is established the button will turn green! 

2) Dropbox itself will automatically generate a new folder in your account on your first log-in with the app. Please have a look at your dropbox account and you will notice a new folder at:  Dropbox => Apps => SimpleAudioMastering.  This is the place for all the file exchange within the app! 

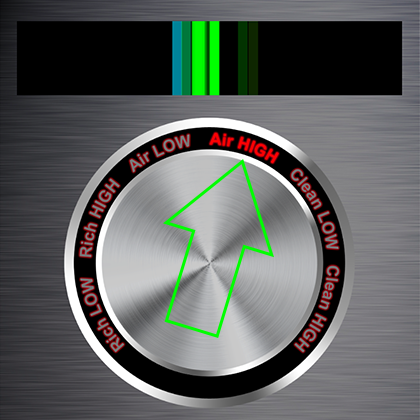
2) pick your audio track you want to apply the audio processing. You can pre-listen your audio track and choose from six different presets by turning the big knob in the middle. The meter at the top is showing the signal statistics after the processing. The bar should stay in the green area on the loudest parts - some rare peaks to red are fine! If the meter is inside the red area for more than 50% of the time we recommend to choose the corresponding"LOW" preset.

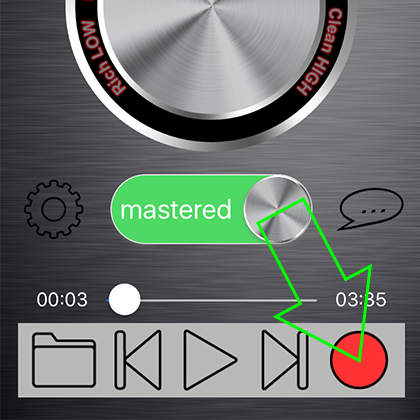
3) When you found the best setting, press the red record button at the lower right side to start the offline audio processing of your audio track. The finished track will be stored in the mastered files folder.

The blue progress bar above the timeline will show the remaining time.

HINT: When tring to re-master an already mastered track the processing may not be able to improve the sound quality as much as on unmastered tracks!


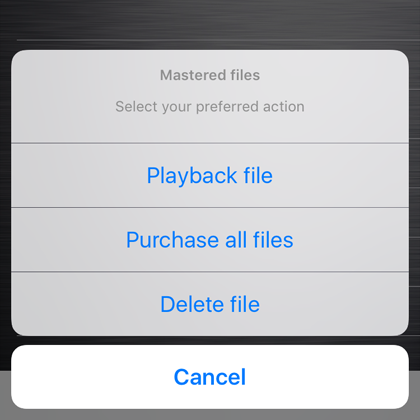
4) The output of the apps audio processing can be found when selecting the folder button again and choose "mastered tracks".

Click on the file to choose the options from the action sheet. If you are satisfied with the results and want to purchase the files select "purchase all files" to buy all files that are included in the folder. Please erase unwanted files before purchase by deleting them from the folder.

Right after the purchase the files from the mastered folder will be copied to the user folder where you can pick them up via iTunes - see instructions above. When you are logged into your dropbox account the app will upload the files to your dropbox folder!

Hint: If you want to erase a single files you can also use the swipe gesture on the cell to unveil the delete button.


HINT: Please also have a look at the user settings, here you can find some extra settings that may help you!


FAQ:


Q: What is the meter at the top showing?

A: The meter shows the signal statistics after the processing is applied! It combined two parameters and shows the dynamic range of the processed signal. The meter should always stay in the green area - some rare peaks to red are fine! If the meter is inside the red area for more than 50% of the time we recommend to choose the corresponding"LOW" preset.


Q: What is the processing doing?

A: This is of course part of the "magic" - but be sure that the signal integrity is always maintained. It took more than two years and hundreds of listening sessions to develop the audio algorithm!


Q: After processing I can hear noise that wasn't there before. What can I do?

A: Sometimes it can happen that there is noise audible in the mastered files especially on very quited sections. The mastering process in general is not adding any noise, but it could happen that noise from the original recording become more audible as certain frequencies get boosted and the gain increased. If you experience noise issues try the following:

1) In multi-track recordings there is often one channel that is contributing more noise than others! Check your audio recording software and mute one channel after the other to find the one that is adding most of the noise. A typical example is the microphone channel that is picking up a guitar amplifier - those amps produce a lot of noise! Once you found it try to fix the problem by adding a volume automation or an noise gate to mute this channel when no signal is played back.

2) Check your output section if there is any noise shaping (Dither) activated - please completly switch those off!!! Dither is only necessary at the very last step when the bit length is reduced to 16-bit. Also check the bit length of your output file it has to be at least 16-bit for best possible results we recommend to use 24-bit!


Q: After processing I can hear distortion that wasn't there before. What can I do against it?

A: Problems with distortion can have several different reasons. Most of the time the distortion is already in the input file before mastering and become more audible in the mastering process.

If you notice a distortion, load the input file to your audio recording software and check the waveform of the input file at the section where you hear a distortion and zoom in at the maximum of the amplitude. If there is any "flat" area visible this is a clipping caused by too much output gain.
To fix this please reduce the output level of your audio recording software until there is no such "flat" area appearing in the waveform anymore!

In some rare cases the mastering could also cause distortion, especially when the input material is already much compressed. The presets "rich" and "air" are using non-linear processing components inspired by analog signal chains. If you have checked the input file and still notice distortion choose the preset "clean" that will not have any non-linear components.

Cookies make it easier for us to provide you with our services. With the usage of our services you permit us to use cookies.
Ok Decline